blockquote{border-left:4px solid #3b82f6;margin:1.5em 0;padding:1em 1.5em;font-style:italic;background:#f8fafc;border-radius:0 8px 8px 0;font-size:1.1em;color:#1e293b}
.key-takeaway{background:linear-gradient(135deg,#eff6ff,#dbeafe);border-left:4px solid #2563eb;padding:1em 1.5em;margin:1.5em 0;border-radius:0 8px 8px 0}
.key-takeaway strong{color:#1e40af}
.stat-highlight{text-align:center;padding:1.5em;margin:1.5em 0;background:#f0fdf4;border-radius:12px;border:1px solid #bbf7d0}
.stat-highlight .stat-number{display:block;font-size:2.5em;font-weight:800;color:#16a34a;line-height:1.2}
.stat-highlight .stat-label{display:block;font-size:.95em;color:#374151;margin-top:.3em}
.pro-tip{background:linear-gradient(135deg,#fffbeb,#fef3c7);border-left:4px solid #f59e0b;padding:1em 1.5em;margin:1.5em 0;border-radius:0 8px 8px 0}
.pro-tip strong{color:#92400e}
Phishing hits small firms hard. One click can lock up files, steal client data, and cost thousands. This guide shows you how to set up a Monterey small business phishing simulation that keeps your team safe and meets compliance.
We’ll walk through ten clear steps. You’ll see why each step matters, get real‑world tips, and know where to get help from a trusted local partner.
Ready to start? Let’s go.
| Step | Objective | Typical Timeline | Best For | Source |
|---|---|---|---|---|
| Maintain a good cadence (run simulations every 4‑6 weeks) | Ensure regular testing to maintain awareness, recommending simulations every 4‑6 weeks. | every 4-6 weeks | Best for cadence maintenance | proofpoint.com |
| Week 7 and beyond | Enter continuous monthly cadence. Adapt scenarios to role‑based risks. | Week 7 and beyond | Best for continuous cadence | brside.com |
| Week 6 | Launch Campaigns 2 and 3. Capture data from all three baseline campaigns. | Week 6 | Best for multi‑campaign rollout | brside.com |
| Week 5 | Launch Campaign 1. Monitor reporting mechanism, time‑to‑first‑report, and helpdesk tickets. | Week 5 | Best for first campaign launch | brside.com |
| Week 2 | Select your simulation platform. Define your four core metrics with target trajectories. | Week 2 | Best for platform selection | brside.com |
| Week 1 | Assemble your steering committee with CISO, HR, Legal, IT/SOC, and Communications. Draft your ethics charter. Define off‑limits scenarios and data handling policies. | Week 1 | Best for steering committee setup | brside.com |
| Weeks 3-4 | Brief helpdesk and managers with FAQ documents and talking points. | Weeks 3-4 | Best for helpdesk briefing | brside.com |
| T‑24 hour checklist | Brief your helpdesk on what to expect and provide FAQ responses. | 24 hours before launch | Best for pre‑launch checklist | brside.com |
| Launch day monitoring (first 48 hours) | Watch for 10 or more reports in the first two hours. | first 48 hours | Best for launch‑day monitoring | brside.com |
| First meeting agenda | Schedule 90 minutes and cover these items. | 90 minutes | Best for kickoff meeting | brside.com |
| Prepare a repeatable report template for compliance submissions | Prepare a repeatable report template with an executive summary, top‑level KPIs, trend charts, controls mapping, detailed tables, raw logs, and remediation records. | monthly internal dashboards and quarterly formal reports | Best for reporting | lakeridge.io |
| Metrics must be precise and auditable | Core metrics to collect and report: delivered count, unique clicks, reported attempts, credential submissions, median time‑to‑report, remediation training completion within X days, and repeat offender counts. | — | Best for metric definition | lakeridge.io |
| Design a mix of templates | Design a mix of templates (link‑based, attachment, branded lookalikes, and non‑credential bait) and classify each template by risk level. | — | Best for template design | lakeridge.io |
| Coordinate with email admins and security tools before launching | Whitelist vendor sending IPs or simulation domains in your email security gateway (Proofpoint/Exchange Online Protection/Gmail), configure SPF/DKIM for the simulation sending subdomain and ensure DMARC alignment for deliverability, and register sending IPs with your MTA to avoid being blocked. | — | Best for email admin coordination | lakeridge.io |
| Start by documenting the practice | Define objectives, scope, allowed templates, and exclusions in a short “Phishing Simulation Plan”. | — | Best for planning | lakeridge.io |
| Meticulously plan the campaign | Define the campaign’s scope, target employees, frequency, and phishing techniques to be used. | — | Best for campaign scoping | proofpoint.com |
| Select the appropriate tool | Choose a phishing simulation platform that meets the organization’s needs. | — | Best for tool selection | proofpoint.com |
| Design effective phishing scenarios | Create realistic phishing emails that mimic common attack scenarios. | — | Best for scenario design | proofpoint.com |
| Schedule and execute the simulations | Deliver the designed phishing emails to the selected employees at appropriate times. | — | Best for scheduling execution | proofpoint.com |
| Analyze results and provide feedback | Measure employee responses and deliver targeted training based on results. | — | Best for result analysis | proofpoint.com |
| Send first simulated phish to a 404 error page | Establish a baseline of user vulnerability by using a neutral 404 page. | — | Best for baseline testing | proofpoint.com |
| One‑on‑one meeting for repeat clickers | Address repeat offenders through personal coaching to improve their behavior. | — | Best for repeat‑offender coaching | proofpoint.com |
Step 1: Assess Your Current Security Posture
Before you run any test, you need to know where you stand. That’s the first step in any Monterey small business phishing simulation.
Start with a quick inventory. List every email gateway, every shared mailbox, and every device that touches email. Write down who uses each account. This helps you see which users are high‑risk.
Next, pull logs from your spam filter for the past month. Look for spikes in external mail, unusual attachment types, or repeated “reply‑all” chains. Spotting patterns early lets you focus the simulation where it matters most.
Run a baseline phishing test. Use a low‑stakes email that mimics a common request , maybe a fake invoice. The goal is not to scare anyone but to capture a click‑through rate you can improve later.
When the test finishes, record three numbers: total emails sent, how many people clicked, and how many reported the email. These become your baseline metrics.
Analyze the data. If a particular department clicks more often, that department gets extra training later. If reporting rates are low, you know you need a clearer “Report Phish” button.
Don’t forget compliance. If you handle health data or financial records, check that your current controls meet HIPAA or PCI rules. A quick gap check can be done with a checklist from CISA.
Another useful reference is the NIST Cybersecurity Framework. Map your findings to the Identify and Protect functions.
Bottom line: You can’t protect what you don’t know is weak.
Step 2: Define Realistic Phishing Scenarios
Now that you know where the gaps are, you can craft emails that feel real to your staff.
Look at the attacks that hit Monterey firms most often. A local dental office often sees fake payment‑confirmation emails. A law firm gets fake client‑request messages. Use those as a base.
Here are seven common scenarios from industry research:
- Credential steal , a fake login page that asks for the employee’s work password.
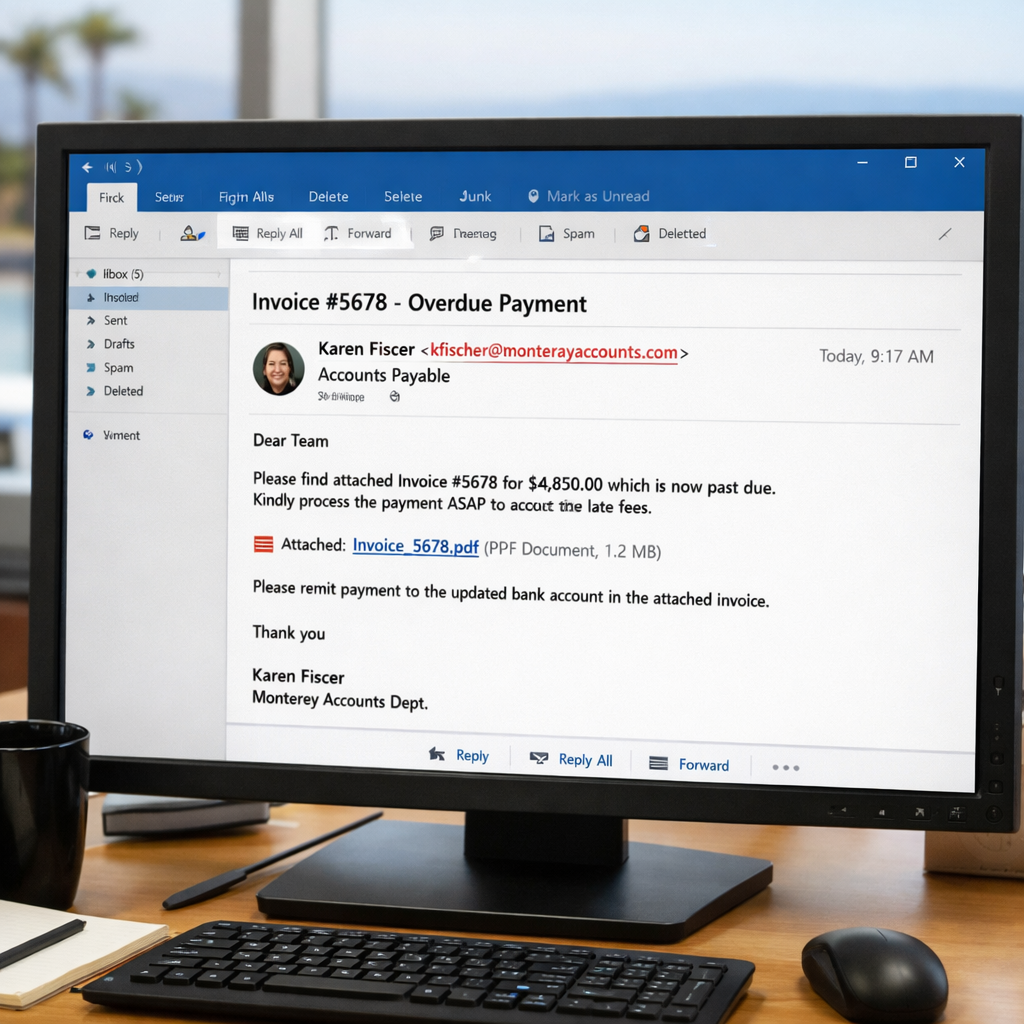
- Urgent invoice , an email that looks like a vendor invoice with a malicious attachment.
- Consent phishing , a one‑click permission request that mimics a trusted cloud app.
- Drive‑by download , a link that pretends to be a software update.
- Attachment with malware , a PDF that claims to be a report.
- CEO fraud , an urgent wire‑transfer request from a “CEO”.
- Fear‑based lure , a warning that data will be lost unless the user clicks.
Each scenario should match a real job role. Finance staff see invoice fakes. IT staff see credential steals. This makes the test more relevant.
When you write the email, keep the language simple. Use the same tone your real partners use. Add a small typo or a slightly odd sender address , that’s often how real attacks slip through.
Test the email with a colleague first. Ask them if it feels legit. Their feedback helps you tweak the lure.
Remember the research finding: only one step warned about CEO impersonation. That means many SMBs miss that high‑risk scenario. Be sure to include it.
Bottom line: Real‑world scenarios make the simulation stick in the mind.
Step 3: Choose a Managed Phishing Simulation Platform
Choosing the right tool saves you time and hassle. A managed platform handles sending, tracking, and reporting for you.
Local providers in Monterey often partner with vendors that run the whole program for you. Look for a service that offers a simple dashboard, easy‑to‑use templates, and built‑in reporting.
One vendor’s site notes that 66% of cybercriminals pick email phishing as their go‑to method. That same site also says they can run quarterly tests and give you a clear report ( Raynetech phishing simulation).
Another advantage is compliance support. A good platform will let you export the data you need for HIPAA or PCI audits.
Ask the provider these questions:
- Do they host the email sending servers?
- Can you customize the templates?
- How do they handle reporting , can you get CSV files?
- What support do they offer if a test triggers a real incident?
Read the fine print. Some services lock you into a yearly contract. Others let you pay month‑to‑month.
When you compare options, keep the research key finding in mind: only one step gave a clear timeline (run every 4‑6 weeks). Pick a platform that lets you set that cadence easily.
Bottom line: Choose a tool that fits your schedule, compliance needs, and budget.
Step 4: Deploy the Simulation and Train Staff
With the platform ready, it’s time to launch the first test.
Send the email to the target group at a time when they’re likely checking mail , mid‑morning is a good bet.
Watch the dashboard for the first 48 hours. The research says you should look for at least 10 reports in the first two hours. If you see that, you know the test is live.
When someone clicks, the platform should instantly show a friendly landing page that says, “You’ve just taken a phishing test. Here’s what to look for.” This turns a mistake into a learning moment.After the test, hold a short training session. Keep it under 15 minutes. Show the email that was sent, point out the red flags , maybe a mismatched domain or a urgent tone.
Use a mix of live talk and a quick video. The video can be hosted on your internal site. It helps staff see the steps again later.
Gather feedback right after the session. Ask a simple question: “Did the example help you spot the fake?” Use a one‑line survey.
Repeat the training for any repeat clickers. A one‑on‑one chat works better than public shaming.
Bottom line: Deploy, watch, and teach right away for best results.
Step 5: Measure Results with a Comparison Table
Measuring is where you see if the program works.
Pull the data from your platform. You need four core numbers: click‑through rate, report rate, median time‑to‑report, and repeat‑offender count.
Put those numbers in a simple table. Here’s a template you can copy:
| Metric | Baseline | Current | Goal |
|---|---|---|---|
| Click‑Through Rate | 27% | — | 5% |
| Report Rate | 12% | — | 30% |
| Median Time‑to‑Report | 45 min | — | 10 min |
| Repeat Offenders | 8 users | — | 0 |
Track the numbers each month. If click‑through drops and reporting rises, you’re on the right track.
Adaptive Security notes that focusing only on click rates can hide other problems. They suggest also looking at reporting rates and repeat offenders ( Adaptive Security).
Keep the table visible to leadership. A quick glance should show progress toward the goal.
Also, compare the results across roles. Finance may need a different scenario than HR.
Bottom line: Measure, compare, and act on the numbers.
Step 6: Refine Policies and Incident Response
After you see the results, tighten your policies.
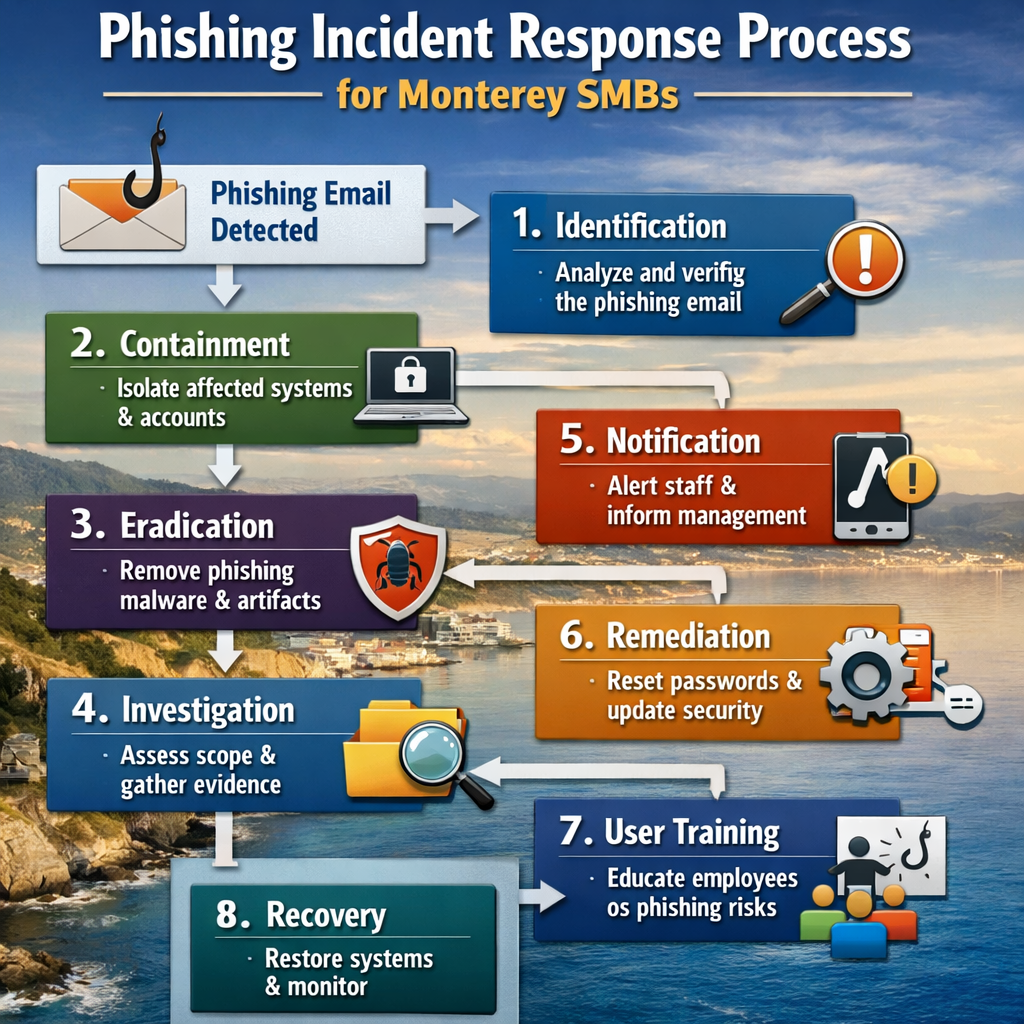
If a user clicks a fake link, your incident response plan should kick in. That plan needs clear steps: isolate the device, reset passwords, and run a scan.
Look at the findings from Adaptive’s network guide. They stress that a solid network is the base for any security effort.
Update your email security settings. Whitelist the IPs your simulation platform uses. This avoids false blocks.
Write a short policy that says: “If you suspect a phishing email, do not click. Use the Report button and call IT.” Keep it short so people remember it.
Train the helpdesk on what to expect. Give them a FAQ sheet so they can answer users quickly.
Run a tabletop drill once a quarter. Walk through a scenario where a real phishing email lands. Practice the steps you just wrote.
Bottom line: Refine rules and rehearse response to keep the safety net tight.
Step 7: Schedule Ongoing Simulations
One test is not enough. You need a regular cadence.
Research shows the sweet spot is one simulated email per month. More than three a month can cause fatigue ( SoSafe guidance).
Build a simple calendar:
- Month 1: Basic credential‑steal test.
- Month 2: Invoice‑attachment test.
- Month 3: CEO‑fraud test.
- Quarter 4: Role‑specific test for finance.
Mix in short tip emails between tests. A 30‑second note about checking the sender address keeps the habit alive.
When new hires join, add them to the next simulation cycle within their first two weeks. That way they learn the rules early.
Track the same four metrics each month. If click‑through rises, you may need to pause or adjust the difficulty.
Remember the research finding that only 48% of steps gave any timing advice. Your schedule fills that gap.
Bottom line: Plan, repeat, and fine‑tune the cadence.
Step 8: Use Managed IT Services for Continuous Protection
Running a simulation is just one piece of the puzzle. Ongoing protection needs a partner that watches your network 24/7.
SRS Networks has been helping Monterey firms for 28 years. They provide managed monitoring, backup, and quick help‑desk response. That means you get alerts the moment something odd happens, and a team that can act fast.
When you work with a local MSP, they can also manage the phishing platform for you. They keep the templates fresh, handle the reporting, and make sure the data feeds into compliance logs.
Look for a provider that offers:
- Proactive monitoring of email gateways.
- Regular patching of endpoints.
- Backup and disaster recovery that meets HIPAA and PCI.
- Help‑desk support that knows the phishing playbook.
The same IT Team article notes that managed services cut downtime and keep compliance on track.
Ask the provider how they handle incident response. Do they have a run‑book? Can they isolate a compromised machine in minutes?
By pairing your simulation program with managed IT, you get a safety net that catches threats before they spread.
Bottom line: A trusted local partner turns a one‑off test into a lasting shield.
FAQ
What is a Monterey small business phishing simulation and why does it matter?
A Monterey small business phishing simulation is a safe test that sends fake phishing emails to your staff. It shows who might click and who will report. The test helps you train employees, reduce risk, and stay compliant with laws like HIPAA. By catching weak spots early, you avoid real attacks that could shut down your office.
How often should a Monterey small business run phishing simulations?
Most experts recommend one simulated email each month. That keeps the habit fresh without causing fatigue. You can add a role‑specific drill every quarter for higher‑risk teams. The goal is a steady rhythm that builds awareness over time.
What metrics should I track after each simulation?
Track click‑through rate, report rate, median time‑to‑report, and repeat‑offender count. These numbers show if training is working and where you need more focus. Compare each month to the baseline you set in Step 1.
What should I do if an employee clicks the fake link?
Send an immediate “nice catch” email that explains the red flags. Follow up with a short one‑on‑one coaching session. Keep the tone supportive so the employee stays willing to report real threats.
Do I need a big budget to start a phishing simulation?
No. You can start with a low‑cost managed platform or even use free tools that let you send a few test emails. Pair the test with internal training and you’ll see improvement without a big spend.
Can a phishing simulation help me pass compliance audits?
Yes. Many standards, like HIPAA and PCI, require security awareness training. A documented simulation program with metrics satisfies that requirement and provides evidence for auditors.
How do I involve the help‑desk in the simulation program?
Brief the help‑desk on what to expect before each launch. Give them a FAQ sheet that covers the common questions users may have. When a user reports a test, the help‑desk can log it and forward the data to the security team.
What role does SRS Networks play in this process?
SRS Networks can help you assess your current posture, pick a platform, run the simulations, and provide ongoing managed IT support. Their local knowledge of Monterey businesses means they understand the specific threats you face.
Conclusion
Running a Monterey small business phishing simulation is a proven way to protect your team and your data. Start by assessing where you stand, then build realistic scenarios, pick a managed platform, and run the test. Measure the results, tighten policies, and set a regular schedule. Finally, partner with a trusted local MSP like SRS Networks to keep the whole system healthy.
When you follow these steps, you turn a risky inbox into a line of defense. Your staff will spot scams faster, report them more often, and your business will stay compliant and resilient.
Ready to protect your Monterey business? Contact SRS Networks today for a free assessment and get your phishing simulation program rolling.