Most small health practices think HIPAA compliance is a maze of legal jargon and endless paperwork. The truth is that a solid hipaa security assessment can be broken into clear, doable steps. In this guide you’ll learn how to run a hipaa security assessment that keeps patient data safe, meets the law, and fits into a busy SMB schedule. Let’s walk through each step together, so you can see exactly what to do and why it matters.
Step 1: Define the Assessment Scope
First, you need to know what parts of your IT world the hipaa security assessment will cover. This means drawing a line around every system, device, and service that touches protected health information (PHI). Without a clear scope, you’ll miss hidden risks and waste time on irrelevant tech.
Here’s how to set the scope:
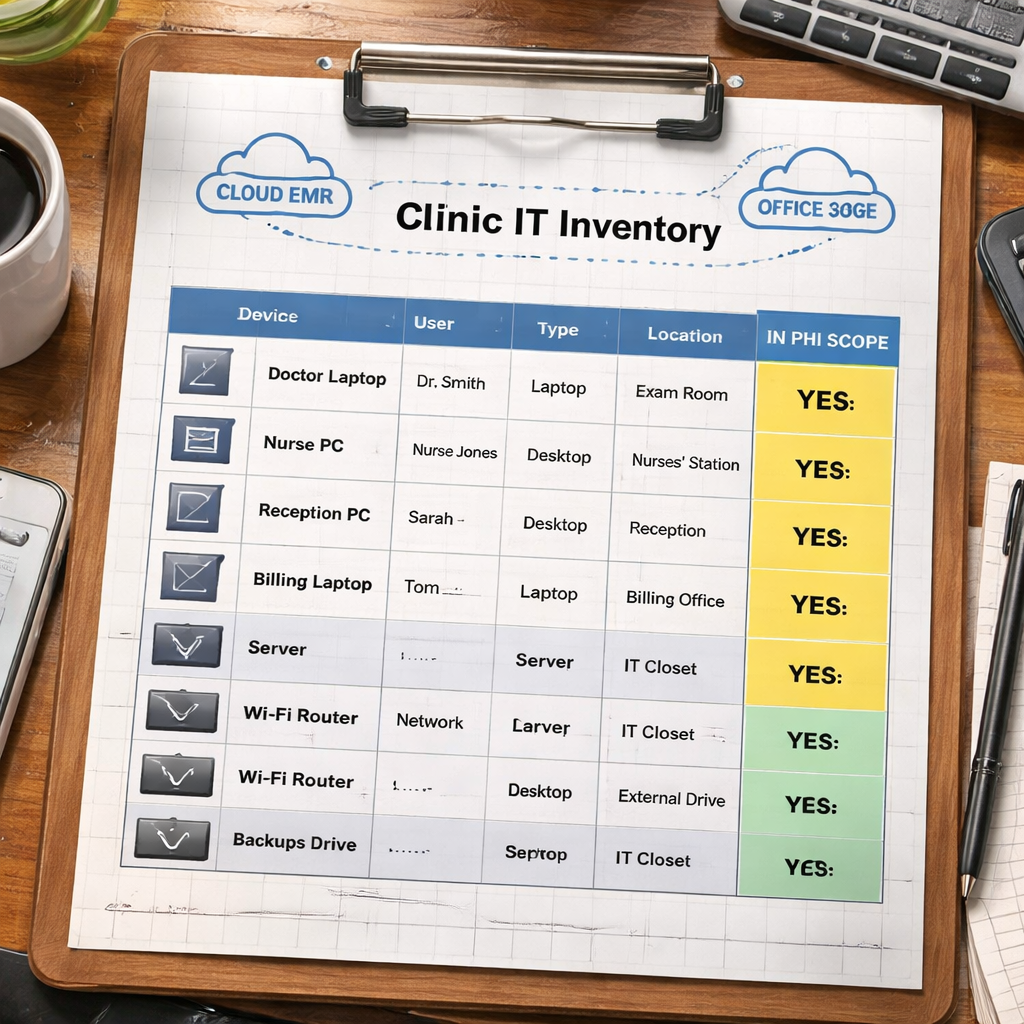
- Make a list of all servers, workstations, laptops, tablets, and mobile phones that store or transmit PHI.
- Include cloud services, SaaS apps, and any third‑party platforms that handle patient data.
- Note who can access each asset and why they need that access.
Ask yourself: “If I lose this system, does patient care stop?” That question helps you prioritize critical assets.
And don’t forget the physical side. Rooms where paper records are kept, backup drives in a closet, and even the Wi‑Fi router in the waiting area belong in the scope if they could expose PHI.
Once you have the list, map each item to a HIPAA security rule category – administrative, physical, or technical. This mapping makes the rest of the hipaa security assessment easier to follow.
Action tips:
- Use a simple spreadsheet to track asset name, owner, location, and PHI relevance.
- Set a deadline of two weeks to finish the inventory – the faster you start, the faster you protect.
- Validate the list with a staff member who works with each system daily; they often know hidden data flows.
For a deeper look at how risk checks fit together, check out the CISA cybersecurity guidance and the NIST Cybersecurity Framework. They give you plain‑language examples you can copy.
And if you want a local perspective on how SRS Networks helps define scope for health clients, read about their Cybersecurity Compliance Services for SMBs.
Step 2: Identify Protected Health Information (PHI)
Now that you know what’s in scope, you must pinpoint exactly which data counts as PHI for the hipaa security assessment. PHI includes any health info that can identify a person – names, dates, test results, billing codes, and even IP addresses linked to a patient.
Start by answering these questions:
- Which applications store patient charts?
- Do you keep scanned paper records on a shared drive?
- Are lab results emailed as attachments?
Imagine if a receptionist saves a PDF of a lab result on a personal laptop. That file is PHI, and it must be covered by the assessment.
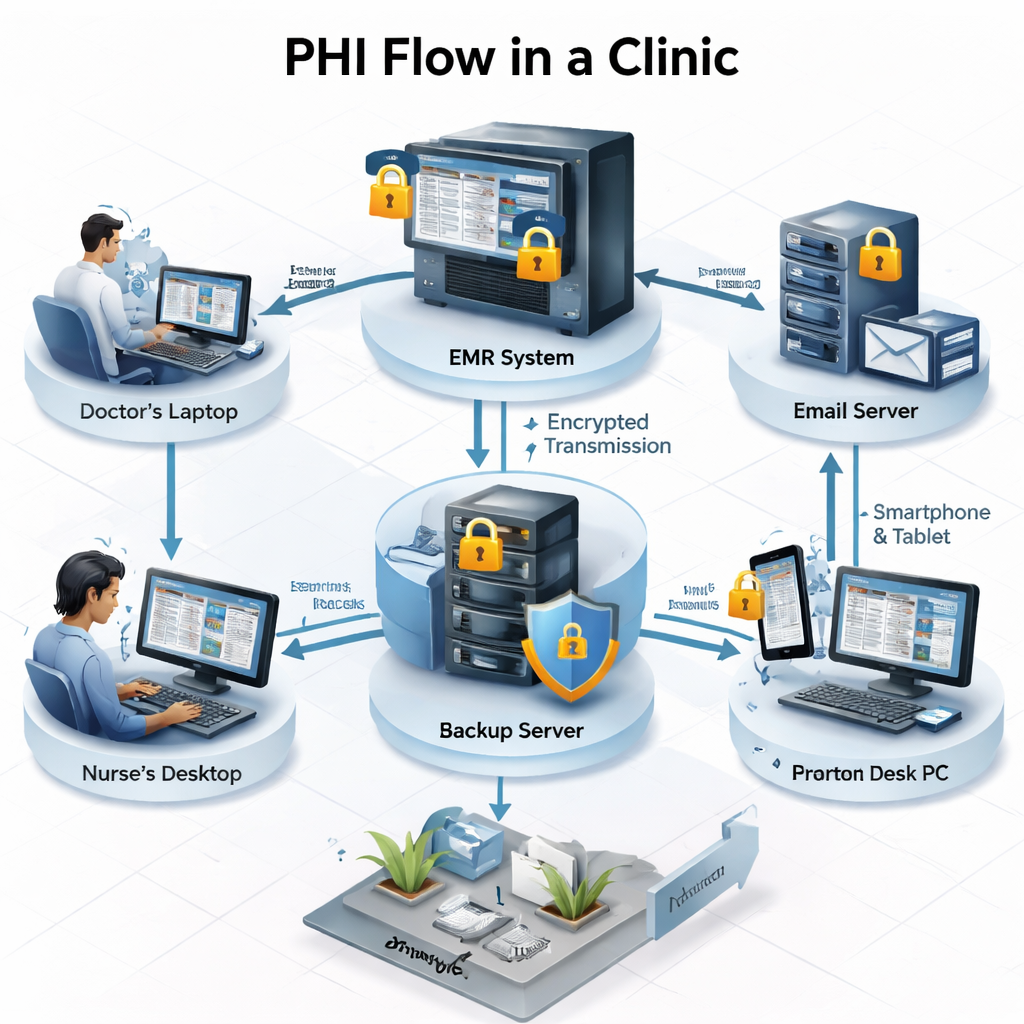
Next, create a data map. Draw a simple flow diagram that shows where PHI originates (e.g., EMR), where it travels (network, email), and where it rests (servers, backups). This visual helps you see hidden exposures.
Don’t overlook indirect PHI. A log file that records user IDs and timestamps can reveal patient activity if it’s combined with other data.
Here are three quick actions:
- Tag each data store as “PHI” or “non‑PHI” in your inventory spreadsheet.
- Verify encryption on any PHI stored on removable media.
- Ask staff to list any ad‑hoc ways they share patient info (messengers, personal email, USB drives).
For plain‑English guidance on what counts as PHI, see the HIPAA IT requirements guide from NYFL Nerds. It explains the rule in everyday terms.
And the same guide also offers a checklist you can download to cross‑check your PHI list. Use it as a sanity test.
Another useful link from the same source explains how to handle PHI in email – a common gap for many SMBs.
Finally, see how SRS Networks helps a local dental office tag PHI across cloud and on‑premises storage in their HIPAA Compliant IT Services overview.
Step 3: Conduct a Risk Analysis
With scope and PHI in hand, the next move in your hipaa security assessment is a risk analysis. This step tells you where threats could hit and how likely they are to succeed.
The federal HealthIT.gov site offers a free tool that walks you through the process step by step. It asks simple multiple‑choice questions, then calculates a risk score for each asset.
Download the tool from HealthIT.gov’s Security Risk Assessment Tool. It works on Windows or as an Excel workbook, so you can choose the format you like.
When you run the wizard, you’ll answer three key groups of questions:
- What threats could target each PHI store? (e.g., ransomware, insider theft)
- What vulnerabilities exist? (e.g., missing patches, weak passwords)
- What impact would a breach have? (e.g., patient harm, fines)
And the tool will flag high‑risk items automatically.
Here’s a quick risk‑rating matrix you can use:
| Risk Level | Likelihood | Impact |
|---|---|---|
| High | Likely | Severe (patient safety, >$1M fines) |
| Medium | Possible | Moderate (reputation hit, $100K‑$1M fines) |
| Low | Unlikely | Minor (administrative work) |
After you have scores, prioritize the high‑risk items first. Those are the things you must fix before the next audit.
Pro tip: Run the risk analysis twice – once now, and again after you’ve applied the first set of fixes. The before‑and‑after scores show progress.
And for a visual walk‑through, watch this short video that shows a real‑world risk analysis in action.
Key takeaways from the video:
- Start with an asset inventory – you already have that.
- Use the HealthIT.gov wizard to score each asset.
- Document findings in a simple table you can share with leadership.
Finally, remember that the risk analysis is not a one‑off task. Schedule it every six months, or whenever you add a new system.
Step 4: Evaluate Controls and Identify Gaps
Now that you know the risks, the hipaa security assessment moves to checking what controls you already have. Controls are the safeguards that stop a threat from turning into a breach.
Typical control categories include:
- Access management – passwords, MFA, role‑based rights.
- Encryption – data at rest and in transit.
- Logging and monitoring – audit trails, intrusion alerts.
- Physical security – locked rooms, device tracking.
- Backup and recovery – regular encrypted backups, test restores.
Grab the worksheet from the University of Pennsylvania HIPAA Gap Analysis (see HIPAA Gap Analysis Worksheet) and fill in each control you have.
Where you mark “No” or “Partial,” you have a gap. Those gaps become your remediation roadmap.
Real example: A small behavioral health clinic used the worksheet and found that their email system lacked encryption. After adding TLS, the clinic closed a high‑risk gap and passed its next audit.
Here are three actionable steps to close common gaps:
- Enable multi‑factor authentication on every account that can view PHI.
- Turn on full‑disk encryption on laptops and desktops that store PHI.
- Set up a centralized logging server and configure alerts for unusual file access.
To see how these controls map to standards, read the CISA best practices and the NIST Framework. They break down each control in plain language.
And for a local case study of how SRS Networks helped a Monterey dental practice tighten controls, see their Understanding IT Security Compliance Services article.

Step 5: Document Findings and Create an Action Plan
The final piece of the hipaa security assessment is a clear report and a step‑by‑step action plan. Documentation proves you’ve done the work and gives leadership a roadmap.
Start with a one‑page executive summary. Include:
- Scope definition.
- Key PHI assets.
- Top three risk scores.
- Major control gaps.
- Projected timeline for fixes.
Then add detailed sections:
- Asset inventory table.
- Risk analysis results (use the matrix from Step 3).
- Control gap table (from the worksheet).
- Remediation actions, owners, and due dates.
SecurityMetrics offers a sample five‑step risk analysis template that matches this format. See their 5‑step HIPAA risk analysis sample for a ready‑made layout.
Also read the HIPAA Times article on corrective action plans (HIPAA Corrective Action Plan guide). It explains why you need to track remediation for at least six years.
When you assign owners, be specific. For example: “Jane – IT Manager – will enable MFA on all remote VPN accounts by March 31.” Clear ownership drives accountability.
Finally, set a review cadence. Schedule a quarterly meeting to update the plan, check completed items, and add new risks if you’ve added systems.
Key takeaways:
- Document everything – auditors love evidence.
- Use simple tables; they’re easy to read.
- Assign owners and dates; no one likes “to‑do” lists without responsibility.
Conclusion
Running a hipaa security assessment doesn’t have to feel like climbing a mountain. By breaking the work into five clear steps – defining scope, identifying PHI, conducting a risk analysis, evaluating controls, and documenting an action plan – you create a repeatable process that protects patients and keeps your practice audit‑ready. Each step builds on the last, so you always know where to focus next.
Remember to involve the people who actually use the systems, use simple tools like the HealthIT.gov wizard, and keep your documentation up to date. When you treat the assessment as an ongoing habit rather than a one‑time task, you lower risk, reduce potential fines, and build trust with patients.
If you’re ready to turn this plan into reality, consider partnering with a local expert who understands both the technology and the regulations. Contact SRS Networks today for a free consultation and let them handle the heavy lifting while you focus on caring for patients.
Frequently Asked Questions
What is the first thing I should do when starting a hipaa security assessment?
The first move is to list every system that stores, processes, or transmits PHI. Create a simple spreadsheet that notes device type, location, owner, and whether it handles patient data. This inventory becomes the foundation for the rest of the assessment, letting you see exactly where risks could hide.
How often should I repeat the hipaa security assessment?
You should run the full assessment at least twice a year, or any time you add a new system, change a vendor, or experience a security incident. A semi‑annual cadence keeps your risk scores current and shows auditors that you maintain a living compliance program.
Can I use free tools for the risk analysis part of the hipaa security assessment?
Yes. The HealthIT.gov Security Risk Assessment Tool is free and designed for small providers. It guides you through threat identification, vulnerability scoring, and impact analysis. Pair it with a basic spreadsheet to track findings, and you have a cost‑effective risk analysis.
What are the most common control gaps found in a hipaa security assessment?
Typical gaps include missing multi‑factor authentication, unencrypted laptops, and incomplete audit logs. Many SMBs also lack a documented incident response plan. Addressing these three areas usually moves a practice from a failing score to a passing one.
How do I prove that I’ve fixed the gaps found in a hipaa security assessment?
Document every change with screenshots, configuration files, and date stamps. Keep a remediation log that lists the gap, the action taken, the responsible person, and the completion date. Store the log where auditors can access it during a review.
What role does a Business Associate Agreement (BAA) play in the hipaa security assessment?
A BAA is a contract that obligates vendors who handle PHI to follow HIPAA rules. During the assessment, you must verify that every third‑party service with PHI access has a signed BAA. Missing BAAs are a compliance red flag and should be addressed immediately.
How can I make the hipaa security assessment less disruptive to daily operations?
Plan assessments during low‑traffic periods and break the work into short tasks. For example, inventory devices on Monday, map PHI on Tuesday, and run the risk tool on Wednesday. By spreading the effort, staff can stay focused on patient care while you progress steadily.
For more on building an SEO‑friendly audit process, see How to Choose and Use an AI SEO Audit Tool in 2026. If you need unrelated inspiration, you can also explore Your Complete Guide to Photo Booth Rental San Diego, How to Choose the Perfect Wedding Photo Booth Rental, Everything You Need to Know About 360 Video Booth Rental, How to Choose the Best Corporate Event Photo Booth Rental for Your Business, Mirror Photo Booth Rental: 7 Must‑Know Tips for an Unforgettable Event, Photo Booth Rental Murrieta: A Complete Guide for 2026 Events, How to Choose the Perfect Prom Photo Booth Rental for an Unforgettable Night, Birthday Party Photo Booth Rental Guide for 2026, Photo Booth Rental for Graduation Party: A Step‑by‑Step Guide, and Your Complete Guide to Photo Booth Rental Temecula for Unforgettable Events.