Managing email efficiently is crucial. One way to do this is by using rules in Outlook.
Outlook’s rules can automate your email organization. By setting rules based on the subject line, you save time and ensure important emails are always prioritized. Understanding how to create these rules can transform your inbox from chaos to order. This guide will explain the steps to set up subject-based rules in Outlook, making your email experience smoother and more productive.
Stick around to learn how to streamline your email management with a few simple clicks.
Introduction To Email Management
Managing emails can be overwhelming. With messages pouring in every day, it becomes easy to lose track of important ones. Learning to manage your inbox effectively is key. Outlook’s Create Rule Subject feature can help you organize your emails, ensuring you never miss important communications.
Importance Of Organizing Emails
Organizing emails is vital for productivity. It allows you to prioritize tasks and respond promptly. A well-organized inbox helps you find information quickly. This saves time and reduces stress. Rules in Outlook can sort emails based on subject lines, making your workflow smoother.
Challenges Of A Cluttered Inbox
A cluttered inbox can be a nightmare. Important emails get buried under a pile of unread messages. You might miss deadlines or forget crucial tasks. This can lead to stress and a decrease in productivity. Outlook’s Create Rule Subject can be a lifesaver. It automatically sorts emails, keeping your inbox tidy.
Getting Started With Outlook Rules
Outlook rules help you manage your email efficiently. They automate tasks, sort your messages, and keep your inbox organized. Learning to create and use rules can save you a lot of time and effort.
Accessing The Rules Feature
First, open your Outlook application. Click on the “File” tab at the top left corner of the screen. This will open the account information page. Look for the “Manage Rules & Alerts” button. Click it to access the rules feature. A new window will pop up, showing your existing rules and options to create new ones.
Basic Rule Setup
To create a new rule, click on the “New Rule” button. This will open the “Rules Wizard” window. You will see various templates for common tasks like moving messages from a specific sender. Select a template that fits your need. Click “Next” to proceed.
Now, set the conditions for your rule. For example, choose “from people or public group” to filter emails from a specific sender. Click “Next” to move on. Set the actions you want Outlook to take, such as moving emails to a folder. Click “Next” again.
Finally, name your rule for easy identification. Review your settings and click “Finish” to activate the rule. Your rule is now set up and will work automatically.
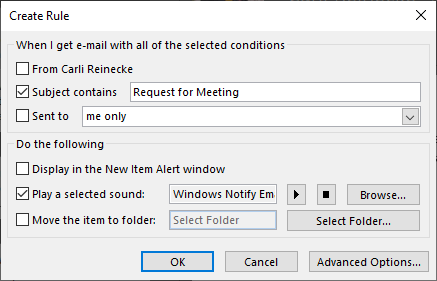
Creating Subject-based Rules
Creating subject-based rules in Outlook can greatly enhance your email management. By setting up rules based on the subject line, you can organize your emails automatically. This saves time and ensures you don’t miss important messages.
Identifying Key Subjects
Before you create a rule, identify key subjects in your emails. Look for common phrases or keywords that appear often. These could be related to work projects, newsletters, or personal communications.
Make a list of these subjects. This helps you stay organized when setting up your rules.
Step-by-step Rule Creation
Follow these steps to create a subject-based rule in Outlook:
- Open Outlook and go to the “Home” tab.
- Click on the “Rules” button in the “Move” group.
- Select “Manage Rules & Alerts” from the dropdown menu.
- In the “Rules and Alerts” dialog box, click on “New Rule.”
- Choose “Apply rule on messages I receive” and click “Next.”
- Check the box for “with specific words in the subject.” Click on “specific words.”
- Enter the key subjects you identified earlier. Click “Add” after each one.
- Click “OK” to confirm your keywords. Then click “Next.”
- Select the action you want Outlook to take. For example, move the emails to a specific folder.
- Click “Finish” to create your rule.
Now, Outlook will automatically manage your emails based on the subjects you specified. This makes your inbox cleaner and more organized.
Advanced Rule Options
Outlook’s Advanced Rule Options offer great flexibility for managing your email efficiently. By setting up custom rules, you can automate email sorting and prioritize important messages. This section will guide you through some advanced rule settings.
Combining Multiple Criteria
Outlook allows you to combine multiple criteria to create detailed rules. This feature is useful for filtering emails that meet several conditions.
- Sender and Subject: Filter emails from a specific sender with a specific subject.
- Date and Keywords: Target emails containing certain keywords received within a date range.
- Attachment and Importance: Identify important emails with attachments.
Combining criteria helps narrow down emails, making your inbox more organized.
Setting Priority Levels
You can set priority levels for your rules to ensure important emails are processed first.
- High Priority: For critical emails, set the rule to high priority. These emails will be moved to the top of your inbox.
- Medium Priority: Use this for regular but important emails. These will be sorted after high-priority emails.
- Low Priority: For less important emails, assign a low priority. These will be sorted last.
By setting priority levels, you can ensure important emails are not missed.
Automating Routine Tasks
Managing emails can be tedious. Outlook’s Create Rule Subject feature helps automate tasks, making life easier. Automating routine tasks saves time and keeps your inbox organized.
Auto-archiving Emails
Keep your inbox clutter-free by setting up auto-archiving rules. Automatically move emails with specific subjects to your archive folder.
Here’s how to do it:
- Open Outlook and go to the Home tab.
- Select Rules and then Manage Rules & Alerts.
- Click on New Rule and choose Move messages with specific words in the subject to a folder.
- Enter the keywords you want to filter by.
- Choose the archive folder as the destination.
- Click Finish to save the rule.
Your emails will now be auto-archived based on the subject keywords you specified.
Forwarding Emails Automatically
Ensure important emails reach the right people by forwarding them automatically. Set up rules to forward emails with specific subjects to designated recipients.
Follow these steps:
- Open Outlook and navigate to the Home tab.
- Click on Rules and then Manage Rules & Alerts.
- Select New Rule and pick Forward messages with specific words in the subject.
- Enter the subject keywords you want to filter by.
- Choose the recipients who will receive these forwarded emails.
- Click Finish to activate the rule.
Now, emails with the specified subject keywords will be forwarded to the chosen recipients automatically.
Credit: finance.uw.edu
Managing And Editing Rules
Managing and Editing Rules in Outlook allows you to keep your inbox organized. With rules, you can automatically move, flag, or respond to emails based on certain criteria. This section will guide you through modifying existing rules and deleting unnecessary rules.
Modifying Existing Rules
To modify existing rules, follow these steps:
- Open Outlook and go to the File tab.
- Click on Manage Rules & Alerts.
- Select the rule you want to modify and click Edit Rule.
- Make the necessary changes to the rule conditions and actions.
- Click Finish to save the changes.
Review your changes to ensure they meet your requirements. Modifying rules helps you keep your inbox relevant and organized.
Deleting Unnecessary Rules
Over time, some rules may become redundant. Follow these steps to delete unnecessary rules:
- Open Outlook and go to the File tab.
- Click on Manage Rules & Alerts.
- Select the rule you want to delete.
- Click the Delete button.
- Confirm the deletion if prompted.
Deleting unnecessary rules helps maintain a clean and efficient inbox. Regularly review and remove rules that are no longer needed.
Troubleshooting Common Issues
In this section, we will address common issues faced when creating rules for subjects in Outlook. Sometimes, rules may not work as expected, or conflicts between rules can arise. Let’s dive into troubleshooting these common issues.
Rules Not Working
Sometimes, your Outlook rules might not work. This can be frustrating. Here are some common reasons and solutions:
- Rule is Turned Off: Ensure the rule is enabled. Go to the Rules and Alerts dialog box. Check if the rule has a tick mark next to it.
- Rule Order: Rules are applied in the order listed. A previous rule might be affecting the desired rule. Try moving your rule up the list.
- Incorrect Conditions: Double-check the conditions set in your rule. Ensure they match the emails you want to target.
- Conflicting Rules: Two rules might contradict each other. Review all rules to ensure they work together.
Conflicts Between Rules
Sometimes, you might have multiple rules that conflict with each other. Here’s how to address conflicts:
| Conflict Type | Solution |
|---|---|
| Overlapping Conditions | Review and adjust the conditions of each rule. Ensure they target different sets of emails. |
| Contradictory Actions | Ensure actions taken by one rule do not negate another. For example, if one rule marks an email as read, another should not mark it as unread. |
| Rule Order | Reorder your rules so they run in a logical sequence. The most specific rules should run first. |
By following these tips, you can ensure your Outlook rules work effectively. Troubleshoot any issues promptly to keep your inbox organized.

Credit: superuser.com
Maximizing Efficiency
Maximizing efficiency with Outlook rules can greatly improve your email management. Creating rules based on subject lines helps you organize your inbox. This ensures important emails are easy to find. It also keeps spam and irrelevant messages out of your primary view. By using Outlook rules effectively, you can save time and reduce stress.
Regular Review And Updates
To maximize efficiency, regularly review your Outlook rules. Ensure they still serve your needs. Email habits and priorities change over time. Outdated rules can clutter your inbox or miss important emails. Update your rules to reflect current projects and contacts. This keeps your email flow smooth and relevant.
Integrating With Other Tools
Integrate Outlook rules with other tools for better efficiency. Tools like Microsoft Teams or task managers can sync with Outlook. This integration ensures important emails trigger actions in other apps. For example, an email with a specific subject can create a task in your manager. This reduces manual work and keeps your workflow consistent.

Credit: community.spiceworks.com
Frequently Asked Questions
How To Create A Rule Based On Subject In Outlook?
To create a rule based on the subject in Outlook, go to the “Rules” menu, select “New Rule,” and choose “Subject contains. ” Input your desired keywords.
Can I Filter Emails By Subject In Outlook?
Yes, you can filter emails by subject in Outlook using the rule creation feature. This helps organize your inbox efficiently.
How Do I Manage Rules In Outlook?
To manage rules in Outlook, go to the “Rules” menu and select “Manage Rules & Alerts. ” You can edit, delete, or create new rules.
Can I Apply Multiple Rules To One Email?
Yes, you can apply multiple rules to a single email in Outlook. This allows for detailed and effective email management.
Automate Your Outlook Inbox: Use Subject-Based Rules for Efficiency
Creating rules in Outlook for email subjects is simple and effective. It helps you organize your inbox better. You can automate sorting and filtering. This saves time and effort. Try setting up a rule today. You’ll notice a cleaner, more manageable inbox.
Enjoy the benefits of a well-organized email system. Start with one rule and gradually add more. Your productivity will surely improve. Happy emailing!